View Selection - What are the elements of interest?
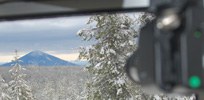
Before you start buying cameras and lenses, realize that you can't make wise choices until you know what you need. This can be done in an orderly manner, and it starts by thinking about who will be looking at these pictures and what is of interest to them.Different users may look at the same picture and see different things. A radio dispatcher may concentrate on activity in the foreground. Weather observers may look at the sky, and potential visitors may check out the scenery in the background. These "elements of interest" may be different for each user, yet it's possible for a single view to include them all.
The person or organization sponsoring your efforts should have particular elements of interest in mind to serve their intended audience. Their interests must be satisfied, or at least listed, prioritized, and met as best possible. (They may want more than they can afford.) At the same time, with little or no additional expense, you may find that the interests of other users might be served as well. Try imagining who they may be, and what they would find interesting. You may find a new type of customer in these users.
We can usually build a list of possibilities which easily exceeds our budget. Now it's time to prioritize and separate the "must" from the "want" items. You may want to start simple and expand later, after you have some experience with success. Don't lose the "want" list, there should always be a place for your dreams.
Some views will be selected because you need them. Significant investment may be required in order to get that view. Other views may be "targets of opportunity", where the infrastructure is largely present and it would be easy to add another camera. As you work to meet your "Must" priorities, consider what else may be possible for little additional expense.
Long distance visibility is a frequent casualty of the weather. If possible, include elements in a scene both near and far. In that way, when it gets really foggy, you'll have something to see besides the inside of a cloud. Even a nearby tree can be an assurance that when visibility improves, the view will return.
Respect the privacy of anyone who may be in the field of view for any reason. Exterior views are generally uncontroversial. Cameras inside buildings can be unwelcome, as most people don't like being "watched".
For each alternative, try getting a picture of the view from that location. This
will help in site selection, and possibly serve as the first picture in your
prototype web page. Other pictures may help with the design process, by noting
where potential useful (or interfering) structures may be located. As you look
around, realize that a site must meet a few fundamental criteria:
Making use of existing structures for support and protection (like sign posts,
towers, and buildings) can relieve you of having to build the equivalent
yourself. This can save a lot of time, money, and effort, and minimize the
visual clutter your efforts will bring to the scene.
When you share a resource like a building, consider your impact on the other
users. Antagonizing them may get you invited to leave, or simply treated
with contempt. Keeping hardware running often takes good will and cooperation,
so try to locate your equipment out of the way and minimize resources (like
electrical outlets) that you will be using. This can help protect you from
accidental damage, as the other parties are not necessarily concerned with
protecting your best interests.
This initial site survey might be all you need to start developing a site design.
Dimensions and locations of support posts, towers, windows, wall space, and
lengths of cable runs would all be handy. Determining the angular width of the
desired field of view may be needed to select a suitable lens. A stick held at
arms length can be used to estimate the angle (to be measured & computed later),
or draw a map of the site and include sight-lines for the field of view..
Notice that the problems aren't limited to "forseen" conditions. What you can
imagine may be only a small part of what nature eventually throws at it.
People, either disinterested or malicious, can add yet more challenges.
"Non-ideal conditions" may affect your installation in one of these ways:
Not every problem requires a complex solution. Simple can be good enough,
cheap, and reliable, but it may not be the first thing we think of when
trying to solve a problem. (NASA invented a nitrogen-pressurized ball point
pen for its astronauts to use in space. Cosmonauts used pencils.)
Almost every one of the above examples has happened, and could (but will not)
be described in annoying detail. In the case of power line surge protection,
we once lost a computer power supply due to someone using a circular saw
plugged into the same outlet. Surge protectors need to be located between
what is creating the problem and what you are trying to protect. Don't make
your protected power outlets accessible for use by other users.
Frequently used solutions for some of the above commonly encountered problems:
Planning should start with the making of four checklists:
A complete equipment list is important because forgetting a major item will mean that
some part of the site design isn't going to work.
Supplies are the small stuff like wire, nails, wood, and conduit fittings that help
mount things and connect them together. Forgotten supplies may not prevent an
installation, but they can slow you down and affect the quality of the workmanship.
Tools, like supplies, can be critical or just nice to have. There is usually a
"right" tool for every job, and likely many "wrong" tools that could do in a pinch.
Using the wrong tool may adversely affect time, effort, and quality of workmanship.
Be especially vigilant for tools which are infrequently used, as they are most
easily overlooked.
These checklists are essentially another design effort, so a good "design" needs to
anticipate more than just installation under ideal conditions. What additional
issues might you encounter and need to handle?
Before taking equipment into the field, consider assembling and testing it in a
location conducive to troubleshooting. New equipment may not work, or cooperate
with other equipment. The place to find and fix these problems is where debugging
is most easily done. Reading user manuals is much more pleasant in the shop,
and you may discover issues that are best handled before going into the
field.
Getting successful operational and troubleshooting experience is also handy. The
experience you gain at the test bench may also help fill-out your tool and supply
checklists. Ideally the field installation will involve little more than mounting
the hardware, making connections, and verifying that it works. Take the User
Manuals, they may be handy in case of difficulties.
The actual installation can be a bit like an expedition. Use your checklists, but
stay flexible. The list (or order) of jobs may need to change, and unexpected
conditions may prevent completing the installation in one visit. Success may need
to come in stages, especially at remote and less-developed sites. Your first
objective may be to establish a secure enclosure to store supplies and support
later visits. Getting materials to a site can be more difficult than getting
yourself to the site, so watch the weather and try to get structures closed-in,
secure, and supplies on-site before access becomes more difficult.
Workmanship issues become important when reliability is concerned. Take the time
to do things methodically and right. Check things out as you go, so that you
can to rely upon whatever has been put in place. Don't assume you'll get back
to correct some detail later; do it right the first time. Expect things to take
longer than you want and you will rarely be surprised. Take a flashlight, because
the day may end before you are done with the job. The penalty for oversights can
be a flakey or inoperative installation, and needing to re-visit the site to
correct what should have been done right the first time.
While doing the installation, note any unexpected situations. Wind whipping cables
on a tower may lead to broken wires: Do you need to lash them down more securely,
or route them in conduit? It has been said that most battle plans do not survive
first contact with the enemy, and the same may be true for new designs. You may
need to alter the plans during the installation. This also suggests that taking
more than a minimal kit of tools and supplies may be useful to handle simple design
changes.
If follow-up visits are required the checklists will be handy to make sure you take
the right supplies and tools for the job. Keep adding to the lists as emergent
issues and needs are identified, either in the field or as you prepare for the next
visit. It's annoying to forget a critical part, and it may be a long time until
the next visit.
If you expect to maintain the hardware in the future, doing (or at least being
present during) the installation will help assure that you know where things
are located. This can make subsequent visits less traumatic when you have to
go it alone. Consider taking pictures of the installation, to help remind you
of otherwise undocumented details. Pictures can also help clarify details when
enlisting the help of others.
As mentioned in the "Site Design" section, trying to anticipate
and defend against all possibilities is pretty difficult. We never have enough time,
money, or wisdom to avoid every possible problem. By monitoring the system's
performance and being observant, you can use time to help identify the shortcomings
which are real and worth fixing.
Consider each problem as an opportunity to improve the design. They represent
oversights for situations you failed to anticipate, or chose to handle, or could
afford to handle adequately at the time. Continuous improvement can significantly
and quickly improve a site's performance and reliability.
You might consider enlisting the aid of others. They may see problems that you
don't, and have improvement ideas worth considering.
We had five camera sites which are linked together on a network using
wireless "bridges". The hardware is very flexible, which is another
way of saying that it takes a bunch of setting configurations to get
it running the way you want. We encountered the following considerations:
We chose to use "static" IP addresses, which are determined by the
network's system administrator. (That could be you.) Addresses are
assigned once and do not change. (DHCP is "off")
Every "bridge" box, network camera, video encoder and computer on the
video network has its own unique IP address (e.g. "192.168.1.241").
Addresses are specific to this network and it's best if you keep a
written record of the assignments. You'll need to know what IP address
to assign when the next piece of equipment (like a visiting laptop)
wants to join the network.
We created two types of local HTML web pages to work with the hardware
on the network. The first page created was for network administrative
use. It is used to test for connectivity to every IP address. Every
live and static video channel on every video encoder and network camera
can be tested from this page with a single click. The page's HTML looks
like:
The second HTML page was created for local users to access the camera
views. It relieves the users of needing to know anything about IP
addresses or the URL syntax: All they need do is click upon the view
which is of interest to them. A "main" page displays six static
pictures, and updates itself every 6 seconds. Hyperlinks connect to
other pages, of which there is a separate page for each group of cameras,
plus a page for each individual camera. This collection of web pages
can be copied and used by any computer connected to any port on the
network.
The following HTML page displays displays a single camera's live picture,
and returns to the main page after 60 seconds:
The "index_Ed.htm" page referenced in the above web page shows a live
view from the primary camera at the site, plus static pictures from
the other cameras in its group. Clicking upon a static picture allows
the user to see live video from that camera. Limiting these web pages
to show one live picture at a time is intended to minimize the network
traffic.
Before a new box goes on the network it needs to be configured, where
at a minimum its network address is set. The network's system administrator
determines what the IP address will be. A CAT5 "cross-over" cable may
be needed to directly connect between the configuring computer and the
new hardware in case the device's default IP address is incompatible
with the network.
Hardware can be operated anywhere on the network where it can be
plugged into an available port on a "switch". New cameras can be tested
and configured in the office, before being deployed in the field. A
laptop computer can visit each site, yet can check-out equipment located
anywhere on the network. This transparency removes the need to go to
a specific location to see how something is working.
Most of the hardware requires some amount of configuring to get it ready
for operation. While there's no substitute for reading the instructions,
here's an idea of what's involved.
Wireless Bridge
Determine the unit's default IP address, like "192.168.1.1", from the package
or turn-on documentation. Connect the bridge to its power source, and to
the network (or computer), and from an MSDOS window try to "ping" it (e.g.
"ping 192.168.1.1"). You should get a 1 or 2 msec response time and 0% lost packets.
Access the box's network interface using an internet browser, using a URL that
contains the IP address and looks like "http://192.168.1.1". You should look at
and probably change many settings:
(These may be the default settings:)
5-port Switch
The easiest box to set-up:
Video Encoders & Network Cameras - Stardot version
The initial set-up uses a serial "null modem" cable which comes with each unit.
Installation software is provided on a CD. If your computer lacks a 9-pin serial
port you will need something like a USB-to-RS232 adapter. A separate computer
with a serial port & CD reader could also be recruited.
Power outlets
The "configuring" here is about being careful with how things are connected.
Having enough outlets for all the power plugs is one consideration. Keeping
everything safe from "power surges" is a bit trickier, as the hazard can
arrive over any external wired connection, not just the power line. The
CAT5 cables make all network hardware at a node communally vulnerable. Each
box, via its power cord, wall wart, and other wired connections, represent
a hazard.
Power-wise, the wall wart for a powered speaker for a computer should be on
the same surge protection as the rest of the node if the computer connects
to the network with a wired (CAT5 cable) connection.
Signal-wise, a phone line going to a printer/fax machine connected to a
computer on the network is also a risk. Without some form of surge protection
it too endangers the network node.
Network Interface Card (NIC)
Prior to purchasing the NIC, a sales person asked about what operating system
was used by the computer into which the NIC was going.
Visiting Laptop Computer or Netbook
These notes were almost unreadable, so guesses were made that should be
similar to the proper spelling or word length ...
On a Windows XP computer:
The general idea is to get:
It would have been handy to have been an expert in this field before starting.
Instead, this has been a learning experience. Much was learned by doing things,
sometimes the wrong way. Other learnings came from the internet while shopping
for information and products. Some experience came from watching the system
misbehave, and then trying to prevent it from happening again. Some design
philosophy was realized while writing this page. Hopefully you find learning
from other people's mistakes cheaper, faster, and more entertaining than doing
it yourself.
The hardware noted here was selected after shopping the 'net for product
features and prices. No doubt there will be newer, better, and cheaper
versions available in the future. Good luck on your hardware selections.
Some details still need to be corrected, but in general this page is good enough
to give you an idea about what needs to be considered. A more detailed
description is probably something I could not stand to write, and you would
not want to read.
Feedback regarding this or related pages can be
emailed to
"
Site Selection - Where to place a camera
Now we are looking for places to mount a camera. It's time to visit the proposed
sites and look around. Take a camera, measuring tape, and notebook, so you can
record basic information about where things are located and get some dimensions.
Look around and try to identify alternative sites, in case your first preference
turns out to be impractical. Keep the "must" and "want" elements of interest
(developed previously) in mind as you look around.
If these criteria are met most other shortcomings can be addressed in the
"Site Design" phase.
Site Design
If you think a camera site will be simple, you probably have overlooked something.
As mentioned before, design begins with a basic installation which works under
ideal conditions. Design should then continue, attempting to anticipate and
eliminate (or mitigate) problems due to all possible non-ideal conditions.
Being able to anticipate unusual conditions generally involves challenging
every assumption you may make about an operating environment. Operational
experience is useful, but that's usually what we don't have at this point
in a new project. Here are a few examples of non-ideal conditions that we
have seen:
- This is the objective of good design.
- Designing a problem "out of existence" may be required to achieve this.
- Still working beats the next alternatives . . .
- Surviving to operate another day can be a reasonable strategy.
- The ability to recover without manual intervention would be good,
as needing to re-visit the site can become annoying.
- The design failed.
- This can be a slow and expensive way to get an education, and it's bad
for reliability and reputation.
Minimizing the impact of events such as these should be a goal of the design
effort. Consider whether the system will be able to automatically restore
itself to normal operation. Manual intervention may eventually become annoying,
or it may be impossible under some circumstances, so the ability to gracefully
handle a problem time after time may be worth considering.
- Staring at the sun can destroy some cameras
- Simply looking at a bright sky (in the direction of the sun at noon) can
bleach a camera's color sensor, and "burn" an image (like a mountain
silhouette) into it.
- During the course of a year the azimuth of the sun's rising and setting
may vary widely. So will its altitude above the horizon. A simple azimuth
versus altitude chart for your latitude might be handy.
- Equipment can be exposed to this even if it isn't being used.
- Summer heat - Sun-baked hardware under a skylight can become too hot to touch
- Winter cold - For installations outside of heated buildings
- Including whatever may fall onto your installation from higher up on a
tower or building
- And if the door blows open during a storm?
- Burning-down buildings is an obvious hazard
- Disrupting utilities and preventing site access for weeks
- How long do you want to operate on back-up power?
- What needs to be done before the next power outage?
- Else they may unplug some of your equipment
Site Installation
Planning and preparation can make it possible to finish an installation reasonably
quickly and successfully. It involves more than just hauling stuff out to a site
and starting to put it together. The penalty for not doing this phase well increases
as the installation site becomes ever more remote.
Don't expect to complete each list in one try, this effort will take time and some work
to capture all of the details. Try starting with the task list, and consider what
needs to be done and in what order. The list of tasks will probably span most phases
of the typical project:
- e.g. Install window, build shelf, mount stuff, connect it, turn-on,
test operation, ...
- e.g. Camera, video encoder, network interfaces
- e.g. Tripod head (camera mount), outlet strip, low voltage control &
power wiring, black-out curtain, shelf brackets, . . .
- e.g. Drill, screwdrivers, multimeter, video monitor, laptop computer, scissors, . . .
- This stuff will not be left at the site after installation is done.
Now consider, for each task, what needs to be in the other three lists to successfully
complete that task. As you think about the entire job you may discover additional
tasks and identify their related resources.
- e.g. If carpentry work is needed, both demolition and construction tools
(and supplies) may be needed.
Site Operation
Hopefully your site will have a long and trouble-free life. More likely, time will
reveal some problems.
Network Management
Filename:  index_admin.htm

<HTML>
<BODY>
<H2> Wireless Network Development Test Page </H2>
<P>
<HR>
<H3> Wireless Bridge boxes </H3>
<UL>
<LI> <A HREF="http://192.168.1.230"> 192.168.1.230 - At South Lodge, to Easy Rider  </A> (login / password)
<LI> <A HREF="http://192.168.1.231"> 192.168.1.231 - At Easy Rider,  to South Lodge </A> (login / password)
...
</UL>

<HR>
<H3> Nodes on the wireless network </H3>

<P>
<UL>
<LI> <A HREF="http://192.168.1.239"> 192.168.1.239 - Base area temperature sensor </A> &
     <A HREF="http://192.168.1.239/setup.html"> set-up page  </A> (login / password)
<P>
<LI> 192.168.1.241 - Lodge -
     <A HREF="http://192.168.1.241"> 4 channel video encoder </A> (login / password)
<LI> 192.168.1.241 - Lodge - camera #1 -
     <A HREF="http://192.168.1.241/index.html?cam1=on&size=1&columns=2&mode=0"> live </A>
   - <A HREF="http://192.168.1.241/jpeg.cgi?0"> static </A>
...
<LI> 192.168.1.241 - Lodge - camera #4 -
     <A HREF="http://192.168.1.241/index.html?cam4=on&size=1&columns=2&mode=0"> live </A>
   - <A HREF="http://192.168.1.241/jpeg.cgi?3"> static </A>
...
</UL>

</BODY>
</HTML>
("..." sections represent many additional lines which look very similar.)
Filename:  index.htm

<HTML>
<HEAD>
<TITLE> Hoodoo Butte pictures (6 second update) </TITLE>
<META HTTP-EQUIV="Refresh" CONTENT="6">
</HEAD>

<BODY>
<TABLE BORDER=5>
 <TR>
  <TD>
   <CENTER>
    <A HREF="index_Grn0.htm"> <! Full-rate URL here>
     <IMG SRC="http://192.168.1.245/jpeg.cgi?0" WIDTH="320" HEIGHT="240">
     Green Chair top </A> &
    <A HREF="index_Grn.htm"> related cameras</A>
   </CENTER>
  </TD>

  <TD>
   <CENTER>
    <A HREF="index_Ed0.htm">
     <IMG SRC="http://192.168.1.243/jpeg.cgi?0" WIDTH="320" HEIGHT="240">
     Ed Chair top </A> &
    <A HREF="index_Ed.htm"> related cameras</A>
   </CENTER>
  </TD>

  <TD>
   <CENTER>
    <A HREF="index_Base.htm">
     <IMG SRC="http://192.168.1.241/jpeg.cgi?1" WIDTH="320" HEIGHT="240">
     Base area </A>
   </CENTER>
  </TD>
 </TR>

 <TR>
  <TD>
    ...
  </TD>

  <TD>
   ...
  </TD>

  <TD>
   ...
 </TR>
</TABLE>

<P>
<UL>
<LI> <FONT COLOR="FF0080"> Click the "<A HREF="index.htm">REFRESH</A>" button, or any picture,
     or any link to continue if this page stops updating.
     </FONT>
  <UL>
  <LI> The "failure to update" problem does not seem to happen if two computers are running this web page.
  </UL>
</UL>

</BODY>
</HTML>
Filename:  index_Ed0.htm

<HTML>
<HEAD>
<TITLE> Ed Chair top (live) </TITLE>
<META HTTP-EQUIV="Refresh" CONTENT="60;url=index.htm">
</HEAD>

<BODY>
<iframe src="http://192.168.1.243/popup.html?0"
        width="725"
        height="500">
</iframe>

<CENTER>
 RETURN TO
  <A HREF="index.htm"> Main page</A> or
  <A HREF="index_Ed.htm"> Ed Chair camera group</A> now,
   or automatically return after 60 seconds
</CENTER>

</BODY>
</HTML>
Configuring the Hardware
- Change any factory-provided passwords to keep out prying hackers.
- Record what you changed them to, so you can find them in the future
- e.g. "192.168.1.231"
- e.g. "9"
- (How do you check whether a channel is already in use?)
- e.g. "+20 dBm" = 100 mW
- Use the lowest power possible for reliable communication to reduce
interference with other units, and to maximize the RF transmitter's
lifetime
- Short links can use much less than the maximum power level
- Record the key / password / pass-phrase so you will be able to
find it in the future
- (Can it be set to periodically "sync" to a time server?)
- ?? = "Point-to-Point"
(QFDM?) & CCK
- ?? = "Band B+G"
- Mask = "24"
- DHCP = "disabled"
- Mode = AP bridge
- Band = 2.4 GHz
- SSID = E-ZY NET.EZZ
- Channel = "11" (2462 MHz)
- Encryption = disabled
- Power (OFDM/G) +20 dBm
- Power (CCK/B) = +24 dBm
- Attain IP Protocol = "Fixed IP"
- IP Address = "192.168.1.1"
- Default Gateway = "0.0.0.0"
- DHCP Server = disabled
- MAC Address = "00:11:7C:0C:19:2B"
- Port Status = Connected 100 MBPS
- Show Wireless Clients" -> "Active Wireless Client Table" ...
Once the static IP address has been set, subsequent configuration work can be done
using the unit's internet interface. The URL looks like "http://192.168.1.240",
and a CAT5 crossover cable from the computer to camera makes the connection.
- e.g. 640 x 480 pixels
- If you have several cameras, a consistent format might reduce confusion.
- They can automatically synchronize to a time server.
- A computer on the network needs to be set-up to act as a time server.
Atomic TimeSync
was used. (Freeware!) Enable the "local server" function.
- On the encoders & cameras, in the configuration for date & time,
enter the IP address of the network time server computer, e.g. "192.168.1.201"
Like the challenge of defending against "all hazards" in the design process,
defending against damage from voltage spikes can either be done well to
begin with, or you can figure it out after some hardware has been killed or
damaged. Prevention should be cheaper than replacement, especially if it
happens more than once.
- Located between the wall outlet and all power strips.
- Should feed and protect all of the outlets used by network
related hardware.
- Should feed and protect all of the outlets used by other
equipment with wired connections to the network related hardware.
(Like power supplies to computers and peripherals (printers, game
boxes, amplified speakers, ...).)
- Due to their shapes and orientations, some "wall warts" may obscure
otherwise usable and needed outlets, requiring more outlets than you
may think you need.
- Like TV antennas, telephone & modem lines, network connections, ...
- This is different from the IP address which may already be assigned
to the computer if it has access to the public internet.
- "Start", "Settings", "Control Panel", "Network Connections",
- "LAN or High-Speed Internet", "Local Area Connection [2]", "General" tab, "Properties"
- "Internet Protocol TCP/IP", "Properties"
- e.g. "192.168.1.103"
- LAN settings / IE Tools / Internet Options / Connections (near the bottom) LAN settings
/ ? / Proxy Server (Uncheck the box)
Final Thoughts
 ".
".
2011 03/24